
Switch Audience
Giving Your Dev Box a Permanent Address

Your dev box has an address. The router handed it one during the install and right now everything works. The problem is that address is on loan. It's a DHCP address — Dynamic Host Configuration Protocol — which is a fancy way of saying the router made it up on the spot and reserves the right to change its mind.
Most of the time it won't change its mind. DHCP leases on a stable local network tend to be sticky for a device that is always present. But "most of the time" is not good enough for a server. The one time the address changes is the one time you are in a hurry and cannot find your machine.
There are two clean solutions.
The first is a router reservation — you tell the router to always hand the same address to this machine based on its MAC address, which is a unique hardware identifier burned into the network interface at the factory. The router does the work, nothing changes on the server, and the address is managed in one place. This is the cleaner solution. If you have access to your router's admin interface look for something called DHCP Reservation, Address Reservation, or Static DHCP. Every router presents it differently but the concept is the same everywhere.
If you don't have access to your router — and in a nonprofit office or shared workspace that is entirely possible — you configure the static address directly on the machine. That is what this node covers.
One honest note about static addresses on the machine: if your server is off long enough for the DHCP lease to expire, the router might hand that address to another device. The solution is straightforward — don't turn your server off. Servers don't take days off. Your dev box lives under a desk, runs continuously, and does its job quietly while you do yours. That is exactly how it is supposed to work.
We are going to provide some Linux commands here if you are completely unsure about the command line read our intro command line article first, then come back here.
Find your current address and interface name
At the terminal type:
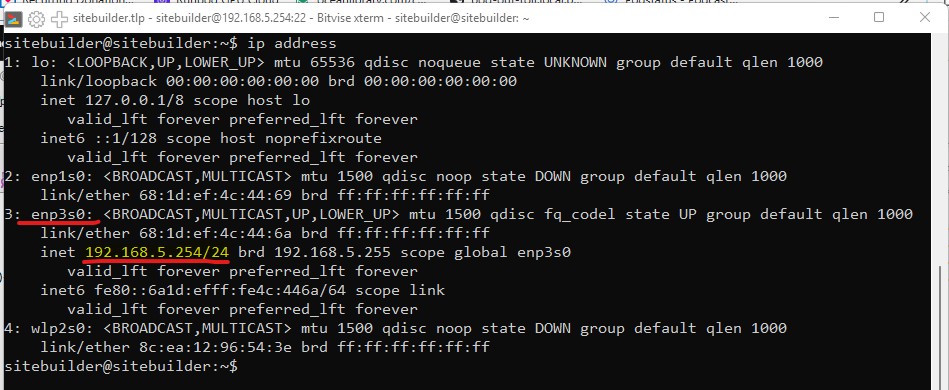
ip addressLook for the ethernet interface — it will have a name like `enp3s0` and an address that matches your local network. Write both down. You will need them in a moment. Also note your router's IP address — typically the same network with `.1` at the end.
How Ubuntu manages network configuration
Ubuntu 24.04 uses a system called Netplan to manage network configuration. Netplan reads YAML files from `/etc/netplan/` and applies them in numerical order. There is already a file in there from the install called `50-cloud-init.yaml` that sets up DHCP.
here is what your current file probably looks like
ls /etc/netplan/
50-cloud-init.yaml
sudo cat /etc/netplan/50-cloud-init.yaml
[sudo] password for bauerhaus:
network:
version: 2
ethernets:
enp3s0:
dhcp4: trueWe are not going to touch that file. Instead we will create a new file with a higher number that overrides it.
Create the configuration file
sudo nano /etc/netplan/99-static.yamlEnter the following — substituting your own IP address, interface name, and gateway:
network:
  version: 2
  ethernets:
    enp3s0:
      dhcp4: false
      addresses:
        - 192.168.5.254/24
      routes:
        - to: default
          via: 192.168.5.1
      nameservers:
        addresses:
          - 8.8.8.8
          - 8.8.4.4
What each line does:
- dhcp4: false — stop asking the router for an address
- addresses — your static IP address. The `/24` is the subnet mask and stays as is for a typical home or office network
- routes — tells the machine where the router is
- nameservers — Google's DNS servers so the machine can resolve domain names on the internet
YAML is unforgiving about indentation. Use two spaces, never tabs. Nano won't warn you if you get it wrong — Netplan will.
When you are done, save with `Ctrl+O`, press Enter to confirm the filename, then `Ctrl+X` to exit.
Apply the configuration
If you see a warning about file permissions being too open, fix it with as shown below
sudo netplan apply


** (generate:1725): WARNING **: 02:22:12.400: Permissions for /etc/netplan/99-static.yaml are too open. Netplan configuration should NOT be accessible by others.

sudo chmod 600 /etc/netplan/99-static.yaml
sudo netplan apply
Now to test it!
sudo reboot 0Wait for the machine to come back up. Reconnect in Bitvise. If it connects on the same address the static configuration survived the reboot and you are done.
Now unplug the monitor. Put it away. You won't need it again.
SUMMARY:
Give your dev box a permanent address, survive the reboot, and the monitor goes in the closet — from here everything happens over SSH.