Drupal SiteBuilder

Main navigation

  • Home
User account menu
  • Log in

Breadcrumb

  1. Home

Getting Ubuntu onto a USB Drive

Fred and Thomas
Why do it this way?

Your mini computer arrived in a box with nothing on it. Before it can become a dev server it needs an operating system. Before it can get an operating system you need to get the installer onto a USB drive.

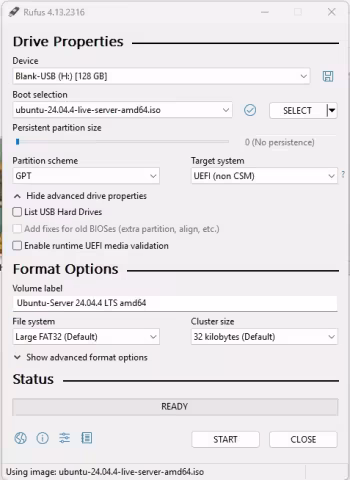
This is a five minute job that sounds more technical than it is. The process is called "flashing" — you're writing the Ubuntu installer onto a USB drive in a way that makes it bootable, meaning the computer can start up from it. You are not doing anything exotic. This is exactly what every systems administrator on the planet does every time they set up a new machine. The tools make it simple.

One thing you will need before you start: a USB drive of at least 4GB. The Ubuntu installer image is 3.2GB, so anything smaller won't work. Drives this size are essentially the smallest thing sold anywhere — you probably have one in a junk drawer. Just make sure it doesn't have anything on it you need. The flashing process erases it completely and does not ask twice.

How to do it:

Get the Ubuntu image

Go to ubuntu.com and download the Ubuntu 24.04 LTS Server installer. Save it somewhere you can find it. It will arrive as a file ending in .iso — that's the disk image.

Try Balena Etcher first

Etcher is the friendlier tool. Go to etcher.balena.io, download it, and launch it — no installation required, it runs directly. The interface has three steps: choose your ISO file, choose your USB drive, click Flash. If it works, you're done.

If you get an error — something like "is not a function" — don't troubleshoot it. Etcher has a known bug with certain versions. Just move on to Rufus.

If Etcher fails, use Rufus

Go to rufus.ie. Be careful on this page — there are large buttons that look like download links but are actually advertisements. Look for the plain text link to the .exe file and download that.

Rufus is also a single file that runs without installing. Open it and make these four selections:

- Partition scheme: GPT

- Target system: UEFI (non CSM)

- File system: Large FAT32

- Write mode: ISO Image mode (not DD)

Image
Rufus

Select your ISO file, select your USB drive, and click Start. Rufus will warn you that the drive will be erased — confirm and let it run.

When it finishes, the progress bar turns green and says READY. That's it. There is no fanfare, no congratulations, no "you're done" message. Rufus just quietly finishes and waits in case you want to flash another drive. You don't. Click Close. The drive is ready.

SUMMARY:

Flash the Ubuntu ISO to a USB drive using Balena Etcher — and if Etcher gives you trouble, Rufus gets the job done without complaint.

Chapter Weight
13

content list

Nobody Needs a Website
Gerald and Fred
Editor, Management, Site Builder

Six Different Jobs
Gerald and Fred
Editor, Management, Site Builder

Everything is a node
Gerald and Fred
Site Builder

What is a Content Type
Gerald and Fred
Management, Site Builder

What can you see in the View?
Gerald and Fred
Management, Site Builder

Why are lists to "Taxing"
Gerald and Spike
Management, Site Builder

Having a picnic with Fields
Gerald and Fred
Editor, Site Builder

He was hit by a beer truck.
Hit by a Beer Truck
Management

Who needs this site
Janet and Thomas
Management, Site Builder

You Need Your Own Box
Gerald and Fred
Site Builder

You Need Your Own Box
Gerald and Fred
Management

What To Buy
Gerald and Fred
Site Builder

Using an AI assistant
an assistant
Site Builder

Using an AI assistant
an assistant
Management

Getting Ubuntu onto a USB Drive
Fred and Thomas
Site Builder

Installing Ubuntu on Your Dev Box
Gerald and Fred
Site Builder

Connecting to Your Dev Box with Bitvise
Janet and Thomas
Site Builder

Giving Your Dev Box a Permanent Address
Gerald and Fred
Site Builder

Your First Linux Commands
Gerald and Janet
Site Builder

Powered by Drupal